
Soy candles have become a popular alternative to traditional paraffin candles because they are natural, renewable, and eco-friendly. They burn cleaner, last longer, and can be customized with fragrances and colors to suit personal preferences. Whether you are a DIY enthusiast, someone that is looking for unique gifts, or even into small business opportunities, learning how to make soy candles at home using our image step by step guide is a rewarding skill.
In this detailed guide, I will walk you through every step of the process from preparation to testing complete with practical tips, real-life examples, and step-by-step images for clarity.
Contents
- 1 Materials and Tools You’ll Need to Make Soy Candles at Home
- 2 Step by Step guide on How to Make Soy Candles at Home
- 3 Step 1: Preparing Your Workspace
- 4 Step 2: Attach the Wick
- 5 Step 3: Measuring and Melting the Soy Wax
- 6 Step 4: Adding Fragrance and Color
- 7 Step 5: Pouring the Wax into Containers
- 8 Step 6: Securing and Cooling the Candle
- 9
- 10 Step 7: Trimming the Wick
- 11 Step 8: Testing and Enjoying Your Candle
- 12 Pro Tips for Successful Soy Candles
- 13 Final Thoughts
Materials and Tools You’ll Need to Make Soy Candles at Home
Before going into how to make soy candles at home, it is important to gather all the necessary supplies because having all the equipment within your reach makes the process smoother, faster and safer.
Essential materials you’ll need include:
-
Soy wax flakes: The base material for your candle.
-
Cotton or wooden wicks: Choose the right size depending on container width.
-
Heat-resistant containers: Mason jars, ceramic mugs, tins, or glass vessels.
-
Fragrance oils or essential oils: Popular options include lavender, vanilla, citrus, or eucalyptus.
-
Candle dye (optional): Adds color for aesthetic appeal.
-
Pouring pitcher or double boiler: For melting wax safely.
-
Thermometer: To monitor wax temperature.
-
Wick stickers or hot glue: To secure wicks.
-
Stirring stick: A chopstick, skewer, or spoon.
👉 Example: For an 8 oz glass jar candle, you’ll need around 6.4 oz of soy wax flakes plus about 0.5 oz of fragrance oil for a medium scent strength.
Step by Step guide on How to Make Soy Candles at Home
To help understand very well on How to Make Soy Candles at Home, we have mapped out 8 unique guide and they are as follows:
Step 1: Preparing Your Workspace
Before you start, set up a safe, organized workspace. Candle-making involves hot wax, which can spill and create a mess if you’re not careful. Lay down old newspapers or baking parchment to catch spills. Make sure your containers and tools are clean and dry.
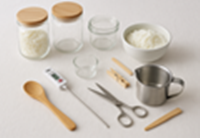
A tidy workspace with jars, soy wax flakes, thermometer, and tools neatly arranged on a covered table.
Tips: Avoid working near open windows with strong drafts, because these can interfere with the cooling process.
Step 2: Attach the Wick
The wick is the heart of your candle. Without it, there’s no flame. Place the wick at the center of your container and secure it firmly using a wick sticker, glue dot, or hot glue. Hold it upright using a wick holder or balance a chopstick across the container rim.
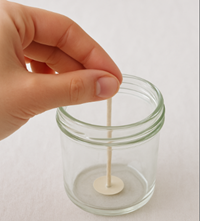
A hand pressing a wick sticker into a glass jar, with the wick standing upright.
Example: If your jar is 3 inches wide, use a medium cotton wick to ensure even burning and prevent tunneling.
Step 3: Measuring and Melting the Soy Wax
Measure the right amount of soy wax for your container. A simple rule of thumb is that the volume of your container in ounces equals the weight of wax needed in ounces × 0.8.
Melt the wax using the double boiler method place a heatproof pitcher filled with wax flakes inside a pot of simmering water. Stir occasionally until it is fully melted.
Soy wax flakes melting in a pitcher over simmering water.
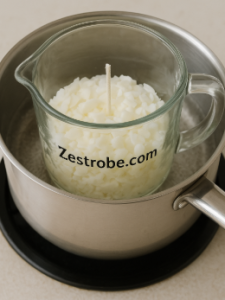
Example: For two 8 oz candles, you’ll need roughly 12.8 oz (362 g) of soy wax flakes.
Step 4: Adding Fragrance and Color
Once the wax is melted, remove it from heat and let it cool slightly. The best temperature for adding fragrance is around 120–140°F (49–60°C). Adding oils at too high a temperature may cause them to evaporate, reducing scent throw.
Pour in your fragrance oil and stir slowly but thoroughly for 1–2 minutes. If desired, add candle dye at this stage.
A person adding lavender essential oil into melted wax.

Example: Use 1 oz of fragrance oil per 1 lb. (16 oz) of wax for a medium scent strength.
Step 5: Pouring the Wax into Containers
When the wax cools to about 110–120°F, carefully pour it into your prepared containers. Pour slowly and steadily to avoid bubbles. Leave about half an inch (1.2 cm) of space at the top of the jar.
Melted wax being poured into a glass jar while a chopstick holds the wick straight.
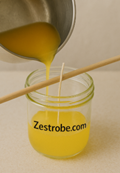
Tip: If you’re making multiple candles, stir the wax occasionally before pouring to prevent fragrance settling at the bottom.
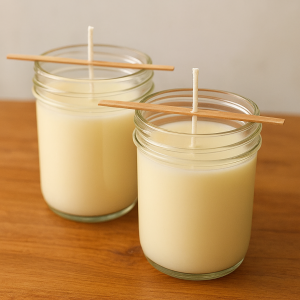
Step 6: Securing and Cooling the Candle
After pouring, make sure the wick stays centered as the candle sets. Use a wick holder, clip, or even tape stretched across the jar opening.
Allow the candle to cool at room temperature, undisturbed, for at least 24 hours. Avoid moving them during this stage to prevent surface cracks.
Two jars cooling on a table with wicks held upright by wooden sticks.
Step 7: Trimming the Wick
Once the candle has hardened, trim the wick to about ¼ inch (6 mm). This helps ensure a steady flame, prevents smoking, and improves the burn quality.
A pair of scissors trimming the wick above the candle surface.
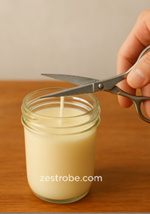
Tip: Never leave long wicks untrimmed, as they cause uneven burning and soot buildup.
Step 8: Testing and Enjoying Your Candle
Your soy candle is now ready to use! Light it and observe how it burns. A well-made soy candle should burn evenly across the container without tunneling (wax building up around the sides).
A glowing soy candle on a bedside table, creating a cozy atmosphere.

Example: If tunneling occurs, consider using a thicker wick next time.
Pro Tips for Successful Soy Candles
-
Cure your candles for at least 2–7 days before lighting to allow fragrance to fully bind with the wax.
-
Choose the right wick size: too small causes tunneling, too large causes smoking.
-
Avoid overheating wax: never exceed 180°F, as this can damage the wax and fragrance.
-
Experiment with blends: mix soy with coconut wax for a smoother burn.
-
Decorate creatively: add dried flowers, herbs, or layered colors for unique styles.
Final Thoughts
Making soy candles at home is more than just a craft it’s an enjoyable and rewarding hobby that can also turn into a small business venture. By following this step by step guide, you can create personalized candles that reflect your personality, fragrance preferences, and style.
Whether you want to make a cozy lavender candle for relaxation, a refreshing citrus blend for your kitchen, or even bulk candles for gifts and sales, the possibilities are endless.
With patience, the right materials, and some creativity, you’ll soon master the art of soy candle-making.

Danz has extensive experience as a senior editor at renowned publications like Money, Consumer Reports, Success, and Reader’s Digest. As a writer, his work has appeared in prestigious outlets such as The New York Times, Parade, Smithsonian, National Geographic Traveler, Investopedia, PBS NextAvenue, and Wirecutter. With over seven years of expertise, Danz specializes in personal finance, Sports, Trends and consumer topics, contributing to both major print and online platforms.